lang fr|gb

the fluxbox session
fluxbox is a 'floating' window manager for X. it is based on blackbox code and inherits its properties by adding features
- editable menu
- editable tabs
- editable titlebar (buttons placement, new buttons, etc.)
- navigate through workspace with mouse scroll
- support for Gnome or KDE dockapps
- editable keybinds, keychains support
- slit: a separate tool for dock apps
- complete toolbar with workspace indicator/switcher, lasklist, systray, date time and hour.
- mostly configurable from menu
screenshot
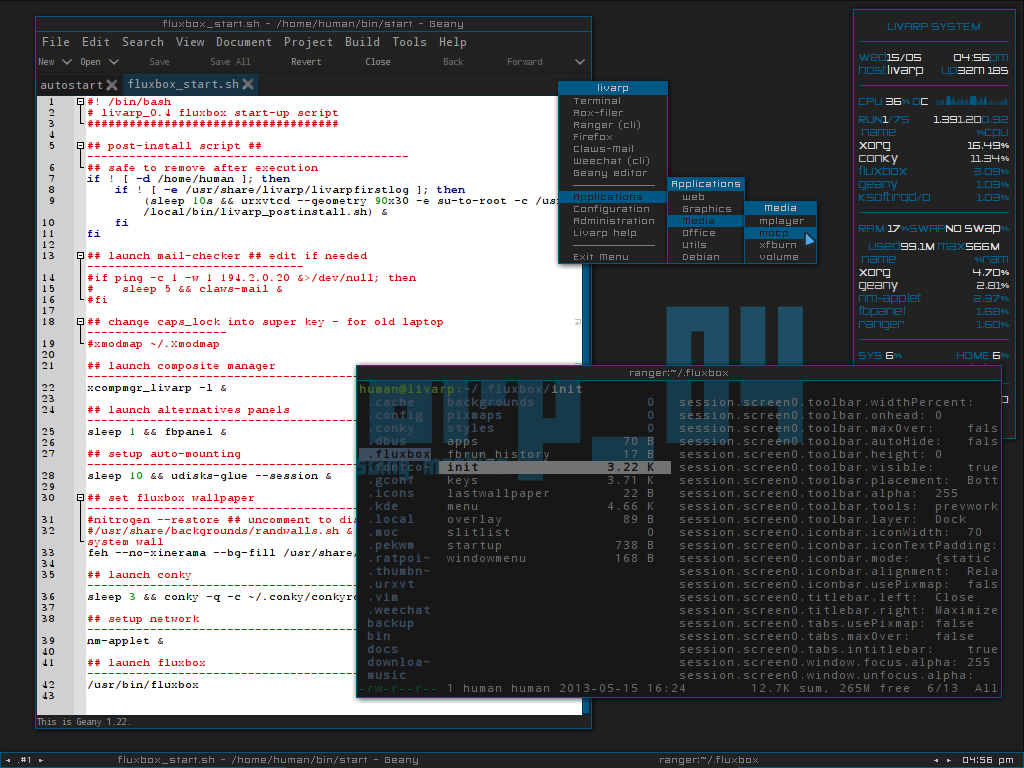
startup
fluxbox is launched by the ~/bin/start/fluxbox_start.sh script.
to change startup applications, simply edit this file:
components
fluxbox is a very complete window manager: menu, panel, systray.. i've just added a conky.
configuration
to configure conky, simply edit its conkyrc:
fluxbox configuration
fluxbox is configured by some files in your ~/.fluxbox. most part of this configuration can be done by the fluxbox menu itself::section config:fluxbox:fluxbox config. fluxbox config menu is very complete and write in the ~/.fluxbox/init file.
to adjust configuration, you have to edit ~/.fluxbox files:
- the apps file: defines some rules for your applications: a very powerfull feature.
you can add properties to this file through the window menu ('remember' tab) but you can't add all options. to define more properties, you have to edit your ~/.fluxbox/apps. syntax is pretty easy and some examples will close this section:
[app]/[group] (app-name) {count - optional}
    [Property1]  {value1}
    [Property2]  {value2}
          ...
[end]
an application is identified by xprop through various properties
- name - name of the window (first part of WM_CLASS)
- class - window class (second part of WM_CLASS)
- title - window title ( WM_NAME )
- role - window role ( WM_WINDOW_ROLE )
[app]...[end] sections provide settings for individual application windows.
These sections begin with a line of the format
This opening [apps] line is followed by any number of settings for the application. See 'settings' for more details.
Each of these sections ends with the single line: [end]
[group]...[end] The primary purpose of [group] sections is to group windows together. All windows in a group will be tabbed together automatically.
These sections begin with a line of the format
This is followed by any number of [app] lines. These have a simiar format to the [app] section detailed above in APP SECTIONS, but do not contain any settings and do not have an associated [end] line.
As with [app] sections, each of these sections ends with the single line: [end]
settings are properties applied to window corresponding to 'pattern'
format is simple
here is the 'settings' list:
- [Workspace] {number}: Forces the application to open on the number workspace specified. Workspaces are set by number, beginning with 0.
- [Jump] {bool}: Changes the active workspace to the remembered one when the application is opened. This is only useful when used in conjunction with [Workspace].
- [Head] {number}: Forces the application to open on the number head specified (Xinerama only).
- [Layer] {number}: Specify the layer to open the window on (by number). Each layer has a number. The named ones are: 2-AboveDock, 4-Dock, 6-Top, 8-Normal, 10-Bottom, 12-Desktop.
- [Dimensions] {width height}: Opens the application with the specified width and height, in pixels.
- [Position] (anchor) {X Y}: Position the application at a particular spot. By default the upper-left corner is placed at screen coordinates (X,Y). If you specify an anchor, say BottomRight, then the lower-right corner of the window is positioned (X,Y) pixels from the lower-right corner of the screen.
anchor may be set to one of: TopLeft, Left, BottomLeft, Top, Center, Bottom, TopRight, Right or BottomRight - [Deco] {value}: Specify the decoration state. There are several predefined value sets:
- NORMAL: Standard decorations
- NONE: No decorations TAB Like TAB except keep the tabs
- Border: Like NONE except keep the X window border
- TINY: Titlebar with only an iconify button
- TOOL: Titlebar only
- [Shaded] {bool}: Whether the window is Shaded (rolled-up) or not.
- [Tab] {bool}: Whether the window has tabs enabled
- [FocusNewWindow] {bool}: If enabled, a new window will grab X focus as soon as it is opened. If disabled, a new window will not grab X focus as soon as it is opened.
- [FocusHidden] {bool}: If enabled, the window will not appear in NextWindow/PrevWindow lists.
- [IconHidden] {bool}: If enabled, the window will not appear in the icon area of the toolbar.
- [Hidden] {bool}: A shortcut for setting both FocusHidden and IconHidden at the same time.
- [Sticky] {bool}: Specify if an application should be sticky (shown on all workspaces) or not.
- [Minimized] {bool}: Application should start minimized
- [Maximized] {value}: Application should start maximized. value may be: {yes} Fully maximized, {horz} Horizontally maximized, {vert} Vertically maximized ou {none} Not maximized.
- [Fullscreen] {bool}: Application should start in fullscreen mode (fully maximized without any decorations).
- [Close] {bool}: Save settings on close. By default, application settings are not updated when a window is closed.
- [Alpha] {value [value]}: Set the alpha value for this window. If two values are given, they correspond to the focused and unfocused transparency, respectively. One number only will be used for both values. value is an integer between 0 and 255.
pattern: A pattern looks like this:
Match definitions are enclosed in parentheses (…), and if no propertyname is given then Name is assumed. The regexp can contain any regular expression, or the special value [current], which matches the corresponding value of the currently focused window.
propertyname is not case sensitive, whereas the regexp is.
If you specify multiple (pattern) arguments, this implies an AND condition - All specified patterns must match.
You can use = to test for equality or != to test for inequality.
The following values are accepted for propertyname:
- Name: A string, corresponding to the CLASSNAME property (The first field of WM_CLASS from the output of the xprop(1) utility). .
- Class: A string, corresponding to the CLASSCLASS property (The second field of WM_CLASS from the output of the xprop(1) utility).
- Title: A string, corresponding to the window title (WM_NAME from xprop(1)).
- Role: A string, corresponding to the ROLE property (WM_WINDOW_ROLE from xprop(1)).
- Transient: Either yes or no, depending on whether the window is transient (typically, a popup dialog) or not.
- Maximized: Either yes or no, depending on whether the window is maximized or not.
- Minimized: Either yes or no, depending on whether the window is minimized (iconified) or not.
- Shaded: Either yes or no, depending on whether the window is shaded or not.
- Stuck: Either yes or no, depending on whether the window is sticky (on all workspaces) or not.
- FocusHidden: Either yes or no, depending on whether the window has asked to be left off the focus list (or, the alt-tab list), or not.
- IconHidden: Either yes or no, depending on whether the window has asked to be left off the icon list (or, the taskbar), or not.
- Urgent: Either yes or no, depending on whether the window has the urgent hint set.
- Workspace: A number corresponding to the workspace number to which the window is attached. The first workspace here is 0. You may also use [current] to match the currently visible workspace.
- WorkspaceName: A string corresponding to the name of the workspace to which the window is attached.
- Head: The number of the display head to which the window is attached. You may match this against the special value [mouse] which refers to the head where the mouse pointer currently resides.
- Layer: The string name of the window’s layer, which is one of AboveDock, Dock, Top, Normal, Bottom, Desktop
- Screen: The number of the currently used screen. If the setup of the running xserver involves independent screens (not Xinerama), the $DISPLAY environment contains something like :0.1 or :1.0. The part after the dot (.) is the number of the screen.
- @XPROP: A string, corresponding to any xproperty (Use either the xprop(1) utility or the SetXProp command to set a xproperty to a window).
examples:
- Put the first two windows which end with 'term' on workspace 1:
[app] (name=.*[tT]erm) {2}
  [Workspace]   {1}
[end]
- Center geany with a specific size, and update these values when the window is close:
[app] (name=geany)
  [Dimensions]  {1022 747}
  [Position]    (CENTER) {0 0}
  [Close]       {yes}
[end]
- When starting luakit, jump to workspace 1 first and start it there.
[app] (name=luakit)
  [Workspace]   {1}
  [Jump]        {yes}
[end]
- start all aterm without decorations.
[app] (name=aterm)
  [Deco]        {NONE}
[end]
- a group with the gimp dock and toolbox appears on layer 4 (bottom).
[group]
  [app] (name=gimp) (role=gimp-dock)
  [app] (name=gimp) (role=gimp-toolbox)
  [Layer]       {4}
[end]
for more infos: man fluxbox-apps :)
- the keys file defines your keybinds/mousebinds
to modify fluxbox keys, simlply edit the file
keys syntax:
- a command: 'Mod1 p :Exec fbrun'
- an action on desktop: 'OnDesktop Mouse1 :HideMenus'
- a group of actions: OnWindow Mod1 Mouse1 :MacroCmd {Raise} {Focus} {StartMoving}
for complete list of fluxbox keys possibilities:
livarp fluxbox keys available on bottom of this page.
- the menu file defines your fluxbox root menu (available with right-click on desktop)
to modify your menu, simply edit the file
fluxbox menu syntax:
[tag] (label or filename) {command or filename}
available [tag]:
[begin] (label)
   This tells Fluxbox to start parsing the menu file. This tag is required
   for Fluxbox to read your menu file. If it cannot find it, the system
   default menu is used in it's place.

[end]
   This tells Fluxbox that it is at the end of a menu. This can either be a
   submenu or the main root menu. There must be at least one of these tags in
   our menu to correspond to the required [begin] tag.

[exec] (label) {command}
   Inserts a command item into the menu. When you select the menu item from
   the menu, Fluxbox runs command.

[exit] (label)
   Inserts an item that shuts down and exits Fluxbox. Any open windows are
   reparented to the root window before Fluxbox exits.

[include] (file-or-directory-name)
   Parses the file specified by filename inline with the current menu. The
   filename can be the full path to a file or it can begin with ~/, which
   will be expanded into your home directory. If the path is a directory,
   then all files in the directory are included.

[nop] (label)
   Insert a non-operational item into the current menu. This can be used to
   help format the menu into blocks or sections if so desired. This tag does
   support a label, but one is not required in which case a blank item will
   be used instead.

[separator]
   This will create a nice separation line. Useful for splitting up sections
   in a pretty way.

[style] (label) {filename}
   This tells Fluxbox to insert an item that, when selected, reads style file
   named filename and apply the new textures, colors and fonts to the current
   running session.

[stylesmenu] (label) {directory}
   Reads all filenames from the specified directory, assuming that they are
   all valid style files, and creates menu items in the current menu for
   every filename, that, when selected by the user will apply the selected
   style file to the current session. The labels that are created in the menu
   are the filenames of the style files.

[stylesdir] (directory)
   Creates a submenu entry with label (that is also the title of the new
   (submenu), and inserts in that submenu all filenames in the specified
   directory, assuming that they are all valid style files (directories are
   ignored) in the same way as the [stylesdir] command does. Both [stylesdir]
   and [stylesmenu] commands make it possible to install style files without
   editing your init file.

[submenu] (label) {menutitle}
   This tells Fluxbox to create and parse a new menu. This menu is inserted
   as a submenu into the parent menu. These menus are parsed recursively, so
   there is no limit to the number of levels or nested submenus you can have.
   The title for the new menu is optional, if none is supplied, the new
   menu's title is the same as the item label. An [end] tag is required to
   end the submenu.

[reconfig] (label)
   When selected this item re-reads the current style and menu files and
   applies any changes. This is useful for creating a new style or theme,
   as you don't have to constantly restart Fluxbox every time you save your
   style. However, Fluxbox automagically rereads the menu whenever it
   changes.

[restart] (label) {command}
   This tells Fluxbox to restart. If command is supplied, it shuts down and
   runs the command (which is commonly the name of another windowmanager).
   If the command is omitted, Fluxbox restarts itself.

[config] (label)
   Inserts a Fluxbox native submenu item, containing numerous configuration
   options concerning window placement, focus style, window moving style,
   etc.

[wallpapers] (directory) {command}
   This allows you to list your backgrounds. This tag is built in to use
   fbsetbg(1) and allows you to simply click on an image to set your
   wallpaper. See? Fluxbox makes it easy… This item can also be hacked to
   perform a command over directory content (it doesn't dive in subdirs,
   it's a hack). For instance, to choose between playlists
   [wallpapers] (~/Music/Playlists) {xmms} will perfectly work.

[workspaces] (label)
   This tells Fluxbox to insert a link to the workspaces menu directly into
   your menu. This is handy for those users who can't access the workspace
   menu directly (e.g. if you don't have a 3 button mouse, it is rather hard
   to middle click to show the workspace menu).
keybinds/mousebinds
configured by the ~/.fluxbox/keys file, here are the livarp fluxbox release shortcuts:
menus:
- fluxbox menu: right-click on desktop
- windows menu: Alt+Space
- fbrun: Alt+p or Alt+F2
- dmenu: Alt+d
- close menus: left-click on desktop
control:
windows:
- close window: Alt+q
- previous/next window: Alt(+Shift)+Tab
- toggle maximize window: Alt+F10
- toggle minimize window: Alt+F9
- fullscreen: Alt+F11
- move window: Alt+left-clic
- resize window: Alt+right-click
- shade window: double-left-click on window title
- start tabbing: middle-click on window title
- previous/next tab: Super(+Shift)+Tab
- tab 'n': Super+'n'
navigation:
- previous/next workspace: Ctrl+Left/Right or scroll Down/Up on desktop or toolbar.
- workspace 'n': Ctrl+F'n'
- send to workspace 'n': Super+F'n'
- send to and display workspace 'n': Ctrl+Super+F'n'
launchers:
- default terminal: Ctrl+Enter, Super+Enter or Alt+F1
- launch ranger: Alt+r
- launch rox-filer: Alt+Shift+r
- launch luakit: Alt+w
- launch firefox: Alt+Shift+w
- launch vim: Alt+e
- launch geany: Alt+Shift+e
- music player: Alt+z
- volume control: Alt+v